Finished

Not having a desk really disrupts my crafting.  Fortunately, I finished it! (Pun totally intended.)

The before (see the last post for more progress shots):

2015 05-25 Desk 2I forgot to get a picture of it after I stained it, but it pretty much looked like a less glossy version of the finished product.  I did, however, get a picture after I was totally done:

2015 07-08 Finished deskIt’s just as smooth and fun to touch as it looks.  I’m super happy about the results, although I’ll be glad if I never need to hand-sand something that big again!

Stripping!

No, not that kind of stripping.

I was doing my nails and set my little cup of acetone down on my desk without realizing some had overflowed and was on the bottom of the cup. By the time I realized what I’d done a few seconds later, it had very effectively stripped the finish off my desk in a ring.

2015 05-25 Desk 1I was upset at first, but then I realized that under the grungy finish, my desk had some really pretty wood.

This is what the desk top looked like:

2015 05-25 Desk 2You can see the acetone ring, and a lot of other scratches and marks.  The whole thing was just vaguely greyish and not very pretty.  I didn’t mind how it looked too much, since it was a nice, solid wood desk that I’d been given by relatives, but once I realized how much nicer it could be, I checked out some tutorials on refinishing wood furniture.  The process seemed like something I’d find fun, so I decided to go shopping.

2015 05-25 Desk 3Stripping the old finish was a pretty easy, though tedious, process.  First I applied the Citristrip and left it to do its business for half an hour to an hour, then scraped the resulting goop off.

2015 05-25 Desk 4It was just as gross in person as it is in the picture.  Once I’d gotten the majority of the old finish off, I wiped the desk down with acetone in order to take off any remaining bits of finish — it had worked very effectively before, and was just as effective this time.

Now my desk looks like this:

2015 05-25 Desk 52015 05-25 Desk 6I was pleasantly surprised how few of the scratches on the desk’s surface had actually damaged the wood.

Next, I’ll be sanding the surfaces and refinishing it.  I still haven’t made up my mind whether or not I’m going to use the red oak stain I got on it, or just leave it the natural color of the wood, but I’m leaning towards using the stain.

This project has taken up a bit more time than I had initially thought it would, and has disrupted some of my other crafting, as my desk is out of commission, but I’m really enjoying it and can’t wait to see the final version!

Oh, and here’s the manicure that started this whole thing, because I can’t resist showing it off:

2015 05-25 Nails

Blocking

If you’re already familiar with the concept of blocking your knitting, feel free to scroll down to the before and after photos.  If you’re not familiar with it, blocking is a way to get all the yarn you’ve just finished looping and twisting while knitting to relax and lie in whatever shape you want.  It is particularly important if your project is lace, as the lace will open up a lot more and be much prettier after it’s been blocked, but it’s helpful for any project, as it can make your stitches appear more even and help combat curling edges.

There are different ways to block your knitting, depending on the fiber content of the yarn and the desired end result.  Today I’m going to talk about how I wet blocked a 100% wool lace ear warmer I recently finished.  Wet blocking seems to be one of the more popular blocking methods and can produce very dramatic results with wool.

Here’s the ear warmer once I’d finished knitting and weaving in the ends:

2015 05-18 Earwarmer 1Doesn’t look like much, does it?

Since I knew I wanted the sides to be straight, I wanted to do some prep work before I got the yarn wet.  Ideally, I would have had blocking wires (special rust-proof wires made for blocking), but since I didn’t, I decided to experiment with running fishing line along the edges I needed to be straight.  It ended up working for me, but I was very careful as fishing line is sharp and wet wool is delicate.

Then I soaked the whole thing in some lukewarm soapy water in my sink for about half an hour (I’d meant to get it after about fifteen minutes, but I forgot about it!).

2015 05-18 Earwarmer 2After that, I rinsed it, rolled it up in a towel and squeezed as much of the water out as I could, then laid it out in the shape I want.  I use the back of my yoga mat for blocking, and I tend to put a towel under my work as I don’t want to take any chances of the color from my mat coming off onto my damp knitting.  Because I had already put the fishing line in place, I was able to just anchor the ends of the line (which I had already tied into loops) with pins and pin out the angles and corners of my knitting.  If I hadn’t had the fishing line, I would have had to put pins every couple of inches along the long sides of the piece, which would have taken longer and might have resulted in a slight scallop instead of the perfectly straight lines I got.

2015 05-18 Earwarmer 3Once the ear warmer had completely dried, I unpinned it, removed the fishing line, and sewed on two buttons to close it.  You can see in the picture below how it lies completely flat and you can see the lace much better than you could right when I finished it.  I could definitely have stretched it tighter for a more dramatic finish, but because I really wanted it to be warm, I didn’t want to make it too lacy!

2015 05-18 Earwarmer 4It buttons closed and works like a normal headband — I particularly like how it covers my ears but not my forehead (my ears get cold long before my forehead does).

2015 05-18 Earwarmer 6

Parking

I recently got the urge to work on my Morning Flight cross stitch again.  Then I quickly remembered why I’d stopped working on it.

Back when I started it, I had decided to do this project one color at a time, going from the background to the foreground.   In general I liked this process, but having to do a ton of one color gets a bit tiring.  When I put the piece down, I had been working on light blue.  You can barely distinguish it from the background fabric and it felt like I wasn’t making any progress.

2015 05-11 Parking 1It actually shows up better in that photo than in real life.

I decided that the one-color-at-a-time thing just wasn’t fun any more, and thought I’d give parking a try.  If you’re not familiar with parking, it basically means working on one small chunk of the piece at a time (I’ve seen a lot of people do 10 stitch by 10 stitch squares at a time) and when you no longer need a particular color of thread in that little chunk, you park it in the next chunk you’re going to work so that it’s waiting for you when you get to it.

I found the process a lot of fun and less confusing than it had looked at first.  I started in the bottom left corner as it had no work done there yet.  I opted to do a row of ten stitches at a time, instead of a ten stitch square, as part of the appeal of parking for me is that you can avoid having to work a stitch that is completely surrounded by stitches (it’s just harder to get your needle through the fabric in those cases).

2015 05-11 Parking 2

When I got to the sections where I had already done quite a bit of stitching, I ended up switching so that instead of working a row at a time, I’m working a 10×10 block at a time — I found it was easier to work around the preexisting stitches that way.

2015 05-11 Parking 3I got a whole column done (okay, it’s a half column, but the pattern is four pages, so it’s a whole column on one page).  I’m very happy with the progress and I’m looking forward to continuing parking on any larger pieces I do.  I do want to switch to working from the top down instead of the bottom up as I had done for this column, as I think it will be easier for my stitching style.

Cards

While my recent posts have all been about cross stitch or knitting, I do other crafts as well.  Lately I’ve been in the mood to do some papercrafting, and have made three cards I wanted to show off.

First, the inspiration for this card came from buying a brown ink pad and having kraft cardstock, which lead me to wonder what I could do with tone-on-tone stamping:

2015 04-27 Happy

Then I needed a card for my grandmother, so I painted her a rose following this tutorial from the Frugal Crafter:

2015 04-27 RoseFinally, I love the look of heat embossing and decided to play with it and a stamp I have:

2015 04-27 TY

(The rose obviously went to my grandmother, but the other two are or will soon be in my Etsy shop if you want one of them.)

Letting go

I’ve never been a one-project-at-a-time type of crafter (which is probably obvious if you’ve read any of my posts).  I start multiple projects and work on them as I like, and it sometimes takes me years to finish something, but I do finish it.

This week I decided to let one of my projects go — you may remember this horse cross stitch:

2015 04-13 HorseI started it because I wanted to start something and I’d wanted to do the pattern for a long time.  And it was fun at first.  But then I just lost interest — looking at it didn’t excite me and working on it felt like a chore.  This past week, it’s even prevented me from working on some of my projects that I do really want to finish, because I felt like it’s nearly done so I should be working on it, even though I didn’t want to (and I didn’t actually have a need to finish it).

After thinking about it for a bit, I decided I wasn’t going to finish it.  I put the embroidery floss back in my general storage and tucked the mostly completed piece and the pattern away (I’m thinking I might eventually want to use the finished part of the horse’s head in another project, so I didn’t want to get rid of it entirely).  I’ve felt a lot better about my crafting after I came to that decision.

I feel like I could have come to the decision to stop working on this project sooner, as it wasn’t fun for a while.  How do you know when you no longer want to finish something vs. you’re just temporarily bored with it?  Do you consciously choose to stop working on something or keep it around in case you change your mind later?

Stitching update

As promised, here’s the update on my cross stitching and blackwork projects.  First up, my Save the Stitches blackwork sampler.

2015 04-13 BlackworkI love this thing — it’s a ton of fun to work and it’s going to be amazing when I hang it on my wall.  My camera sometimes has trouble picking the patterns up, so here are two close-ups to show you the stitching better:  2015 04-13 Blackwork 22015 04-13 Blackwork 3

Next, you may recall that I was working a horse pattern that I’d wanted to do forever but didn’t have the exact right materials for.  It’s coming along well:

2015 04-13 HorseMy only real issue with it is that I don’t love the reddish brown I created with a blended needle:

2015 04-13 Horse 2I don’t feel like ripping it out and I don’t really have a better option, so I’m just not going to worry about it — it looks okay from a distance, and I suspect part of the reason I don’t like it is that I’ve seen the original pattern so I know what it’s supposed to look like.

Finally, I don’t think I’ve actually worked on my Morning Flight since last time you saw it, but I’m including it here for completeness’ sake (plus pulling it out to photograph made me really want to start working on it again!).

2015 04-13 Morning Flight

Knit all the things!

Wow, it’s been a while.  I’ve been busy crafting, but never seemed to be able to get pictures to have anything to share (mostly because I was knitting late at night and never thought about it during the day).

Almost a year ago, I’d talked about a system of bags I’d created so I’d could only have five projects going at one time.  I’m still using the bags, and I really like how they keep my projects contained and in sight but not taking up table space.  However, I’ve got way more than five projects at the moment…  The last couple of months I’ve been in the mood to start a ton of things, and I decided to just go with it.  (And now I’m working on finishing things so I can get back down to five.)  A lot of the things I’m going to be showing today were started in that time.  (You can click on the pictures to go to my Ravelry project page for more details on any of them, or the links to see the Ravelry entry for the pattern and designer.)

First off, if you read my last post on the hanging storage, you’ll remember that I had a pair of cabled knee socks I was knitting.  Since then, I’d realized the yarn I had was terrible for cables, so I restarted them as a pair of lace socks.  Then I decided I didn’t really like the lace pattern.  So I ripped everything out and started poking around Ravelry’s pattern database for ideas.  Turns out, the yarn is perfect for a beaded lace shawl that I’ve been wanting to do ever since I first saw it — Boo Knit’s Out of Darkness.2015 4-8-15 Shawl

If you look at the top edge, you can see I’m finally past all the garter stitch and on to the lace!

I also made myself a little rat out of some of my oldest yarn.

2015 4-8 Rat

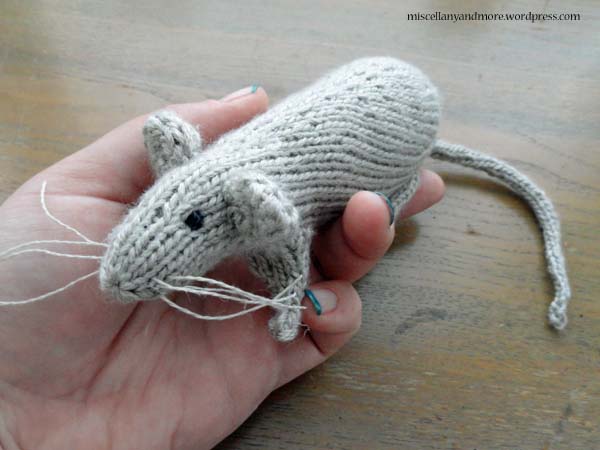
I love the realism of the pattern, by Rabbit Hole Knits.  However, after making this little fellow, I’ve come to the conclusion that I hate working on tiny things that need to be pieced together, so I suspect this will be my last toy.

I also started a really nifty colorwork hat by Liat Hessel — I love the way the pattern comes together at the crown of the hat!  I’m using this as a project to use up some old yarn that I have, and am planning on donating the finished hat, as bright red really isn’t my color.

2015 4-8 Hat

Speaking of using up some leftover yarn, I’m also making myself a lace earwarmer/headband out of the leftovers from another project.  I started it back when it was freezing outside, but of course I didn’t get it done in time to wear it.  I’m hoping that I can get it done before it gets to be freezing again!

2015 4-8 Earwarmer

I also ended up starting two scrap projects, one for my aran-weight acrylic and one for my fingering-weight sock yarn.  For the acrylic, I’m using Frankie Brown’s Ten Stitch Blanket (which is a brilliant design).

2015 4-8 Ten Stitch Blanket

For the sock yarn, I’m using a slight variation on the Beekeeper’s Quilt by Tiny Owl Knits.  I’m not stuffing the hexagons, and I’m planning on sewing them together rather than just tying the corners.  I haven’t made much progress, but it’s a really great project to keep in a little pouch so if I’m running out somewhere and want to grab something to do, I have all my supplies.

2015 4-8 Hexagons

Last, but certainly not least, is my rug.  You may recall when I mentioned that the knitting needle I’d bought for it broke.  The manufacturer sent me a replacement, which is showing no signs of trouble (I am being careful with it, especially as the rug gets heavier and heavier).  I’ve not made a ton of progress since then, but I have gotten several more color stripes done:

2015 4-8 Rug

For the record, I did not force my dog to lie on the rug instead of the couch (where she has been in past photos).  If I leave the rug out somewhere where she can get to it, she will lie on it (she’s currently lying on the folded up rug).

Whew!  That was a lot of knitting to get caught up on (and it really gives me more motivation to stick to my current projects instead of starting more!).  My next update will probably be a progress report on my cross stitch and blackwork, as that’s the other main category of crafting that I’ve been working on.

Winging It

Every so often I get the urge to start a relatively small and quick project.  This time I got the urge to do a small cross stitch piece of a horse by Jan Sorrells that I’d found ages ago in a cross stitch magazine (I’m not sure which one — all I have is a couple of pages torn out of a magazine my mother or grandmother originally had).  I’ve been wanting to do that horse for a while, plus I have some random 14 count aida I want to use up and a bunch of unnumbered bobbins of floss I’d like to work through.

Turns out the piece of fabric would have literally three stitches to spare on either side of the cross stitching.2015 01-30 Horse 1

Meh, I was planning on finishing it as a wall hanging, not framing it, so I can make this work with some fray check and careful handling.

Then I spent a bit of time checking my available floss against images of the DMC floss called for.  I didn’t have enough browns, but I can give the horse a blue halter instead of a brown one and use some blended needles. 2015 01-30 Horse 2 I had a couple of colors that I’d picked out but changed after I started working with them and realized they didn’t work as well as I’d thought they would. This is after about a week’s worth of work:  2015 01-30 Horse 3